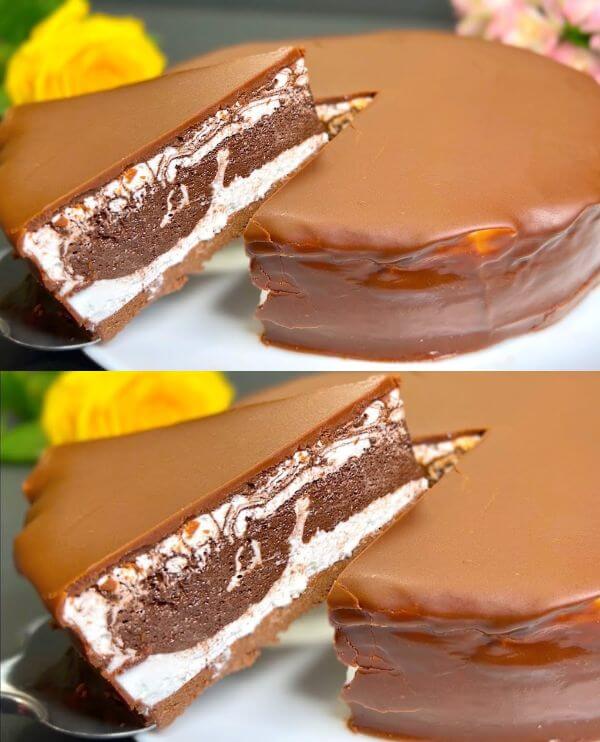
Dessert in Minutes: No Cream Cheese, No Oven, No Condensed Milk, No Flour!
Who said making desserts had to be complicated? This recipe is a game-changer for all dessert lovers out there. With just a handful of ingredients and a few simple steps, you can whip up a delectable treat that will impress everyone at your table. Get ready to satisfy your sweet tooth like never before!
Ingredients
Gather these simple ingredients:
- 7 ounces (198 grams) of chocolate waffles
- 5 large egg whites
- 10.5 ounces (297 grams) of powdered sugar
- 2.8 fluid ounces (82 milliliters) of water
- 0.3 ounces (9 grams) of gelatin or agar-agar
- 0.7 ounces (19 grams) of cocoa powder
- 3.5 ounces (99 grams) of chocolate
- 2.8 ounces (79 grams) of butter
Directions
Let’s dive into the easy steps:
- Crushing the Chocolate Waffles: Use a mixer to crush the chocolate waffles until they form fine crumbs.
- Preparing the Crust: Press the crushed waffles into the bottom of a mold to create the crust.
- Whipping the Egg Whites: Separate the egg whites from the yolks. Whip the egg whites while gradually adding powdered sugar until stiff peaks form.
- Adding Gelatin and Sugar: Dissolve the gelatin in water. Add it to the whipped egg whites and continue whipping until well combined.
- Layering and Chilling: Pour half of the mixture onto the crust in the mold. Mix cocoa powder with the remaining mixture and pour it on top. Chill in the fridge for 30 minutes.
- Melting the Chocolate and Butter: Melt the chocolate and butter together. Pour the mixture over the chilled dessert, covering the top and sides. Chill for another 30 minutes.
Crushing the Chocolate Waffles
Start by breaking down the chocolate waffles into fine crumbs using a mixer. This step ensures that your crust will have a perfect texture, providing a delightful contrast to the creamy layers above.
Preparing the Crust
Press the crushed chocolate waffles firmly into the bottom of your mold. Think of it like laying down a solid foundation for your dessert masterpiece. A well-pressed crust ensures that every bite is packed with flavor and crunch.
Whipping the Egg Whites
Separating the egg whites from the yolks is a crucial step in creating a light and airy texture for your dessert. Whip those egg whites until they reach stiff peaks, adding powdered sugar gradually. It’s like creating fluffy clouds that will elevate your dessert to new heights of deliciousness.
Adding Gelatin and Sugar
Dissolve the gelatin in water and incorporate it into the whipped egg whites along with powdered sugar. This magical combination adds stability and sweetness to your dessert, ensuring that each layer holds together perfectly.
Layering and Chilling
Pour half of the whipped mixture onto the crust, creating a luscious white layer. Then, mix cocoa powder with the remaining mixture to add a rich chocolatey flavor. Once layered, pop your dessert into the fridge to set for 30 minutes. It’s like giving your creation a well-deserved nap to firm up and become even more irresistible.
Melting the Chocolate and Butter
Melt together chocolate and butter to create a decadent topping for your dessert. This step adds a final layer of indulgence, ensuring that every bite is rich, creamy, and utterly satisfying. Pour the melted chocolate over your chilled dessert, covering it completely, and return it to the fridge for the finishing touch.
Final Touches
After chilling for another 30 minutes, your dessert is ready to be enjoyed! Slice into it and marvel at the layers of flavor and texture you’ve created in just a few simple steps. Whether you’re treating yourself or impressing guests, this dessert is sure to be a hit.
Conclusion
Who knew creating a mouthwatering dessert could be so quick and easy? With this recipe, you can satisfy your sweet cravings in no time, without the hassle of complicated ingredients or baking. So go ahead, indulge yourself with this irresistible treat—you deserve it!

