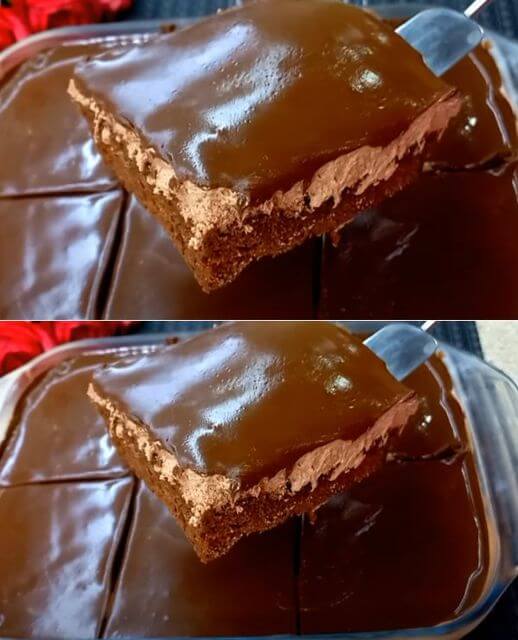
Easy and Quick Chocolate Dessert
Ingredients (Serves 10)
For the Cake:
- 2/3 cup (85 g) flour
- 3 tablespoons + 1 teaspoon cocoa powder
- 1 teaspoon baking powder
- 3 eggs
- 3/4 cup (150 g) sugar
- 1/3 cup + 1 tablespoon (100 ml) milk
- 3 tablespoons + 1 teaspoon (50 ml) vegetable oil
- Butter, for greasing the pan
For the Chocolate Mixture:
- 3 tablespoons + 1 teaspoon cocoa powder
- 1/4 cup (50 g) sugar
- 1/3 cup + 1 tablespoon (100 ml) milk
- 1 tablespoon butter
For the Cream Topping:
- 1 1/4 cups (300 ml) cream
- 3.5 oz (100 g) cream cheese
- 4 tablespoons icing sugar (to taste)
- 1 teaspoon cocoa powder
For Assembly:
- 1/4 cup (60 ml) milk (for soaking the cake)
Nutritional Information (Per Serving)
- Calories: 290
- Protein: 4 g
- Carbohydrates: 30 g
- Dietary Fiber: 1 g
- Sugars: 20 g
- Fat: 18 g
- Saturated Fat: 10 g
- Cholesterol: 85 mg
- Sodium: 100 mg
Step-by-Step Preparation
Step 1: Prepare the Dry Ingredients
- In a medium bowl, mix 2/3 cup (85 g) flour, 3 tablespoons + 1 teaspoon cocoa powder, and 1 teaspoon baking powder. Stir well to combine. This dry mixture will be the base for the chocolate cake.
Step 2: Prepare the Wet Ingredients
- In another large bowl, beat 3 eggs with an electric whisk until they are frothy.
- Add a pinch of salt, 3/4 cup (150 g) sugar, 1/3 cup + 1 tablespoon (100 ml) milk, and 3 tablespoons + 1 teaspoon (50 ml) vegetable oil. Mix well until all ingredients are fully incorporated.
- Gradually add the flour and cocoa mixture to the wet ingredients, mixing continuously until you have a smooth batter. Ensure there are no lumps for an even cake texture.
Step 3: Bake the Cake
- Preheat your oven to 170°C (340°F).
- Butter a baking dish (about 23 cm x 23 cm or 9 x 9 inches) and dust it with a teaspoon of flour to prevent sticking.
- Pour the cake batter into the prepared baking dish and smooth the top with a spatula.
- Bake in the preheated oven for 35 minutes, or until a toothpick inserted into the center comes out clean. Avoid opening the oven door too early to prevent the cake from sinking.
- Once baked, remove the cake from the oven and let it cool slightly on a wire rack.
Step 4: Prepare the Chocolate Mixture
- In a small saucepan, combine 3 tablespoons + 1 teaspoon cocoa powder, 1/4 cup (50 g) sugar, and 1/3 cup + 1 tablespoon (100 ml) milk. Stir well to combine.
- Bring the mixture to a boil, then reduce the heat and let it simmer for about 20 seconds, stirring continuously to dissolve the sugar and cocoa.
- Remove from heat and add 1 tablespoon of butter, stirring until melted and the mixture is smooth. Set aside to cool completely.
Step 5: Prepare the Cream Topping
- In a chilled bowl, beat 1 1/4 cups (300 ml) cream, 3.5 ounces (100 g) cream cheese, and 4 tablespoons icing sugar with an electric whisk until smooth and thick. The cream should hold stiff peaks for the best texture.
- Sift in 1 teaspoon of cocoa powder and gently fold it into the cream mixture until well combined. This will give the cream topping a light chocolate flavor.
Step 6: Assemble the Dessert
- Once the cake is slightly cooled, pour 1/4 cup (60 ml) milk over it to moisten. This step ensures that the cake remains soft and tender.
- Spread the cream mixture evenly over the cake, smoothing the top with a spatula.
- Pour the cooled chocolate mixture over the cream layer, using a spoon to drizzle it evenly. The chocolate mixture will create a beautiful, glossy topping.
Step 7: Chill and Serve
- Refrigerate the dessert for about 8 hours to allow the layers to set and the flavors to meld together. Chilling is crucial for the cream layer to firm up properly and for the dessert to hold its shape when sliced.
- Serve chilled. Use a sharp knife to cut the dessert into squares, wiping the knife between cuts for neat slices.
Tips for the Perfect Chocolate Dessert
- For extra flavor, sprinkle some chocolate shavings or nuts on top of the dessert before serving.
- To save time, the cake and cream layers can be made ahead of time and assembled just before serving.
- Storage: Store leftovers in the refrigerator for up to 3 days. The dessert tastes even better the next day as the flavors continue to blend.

