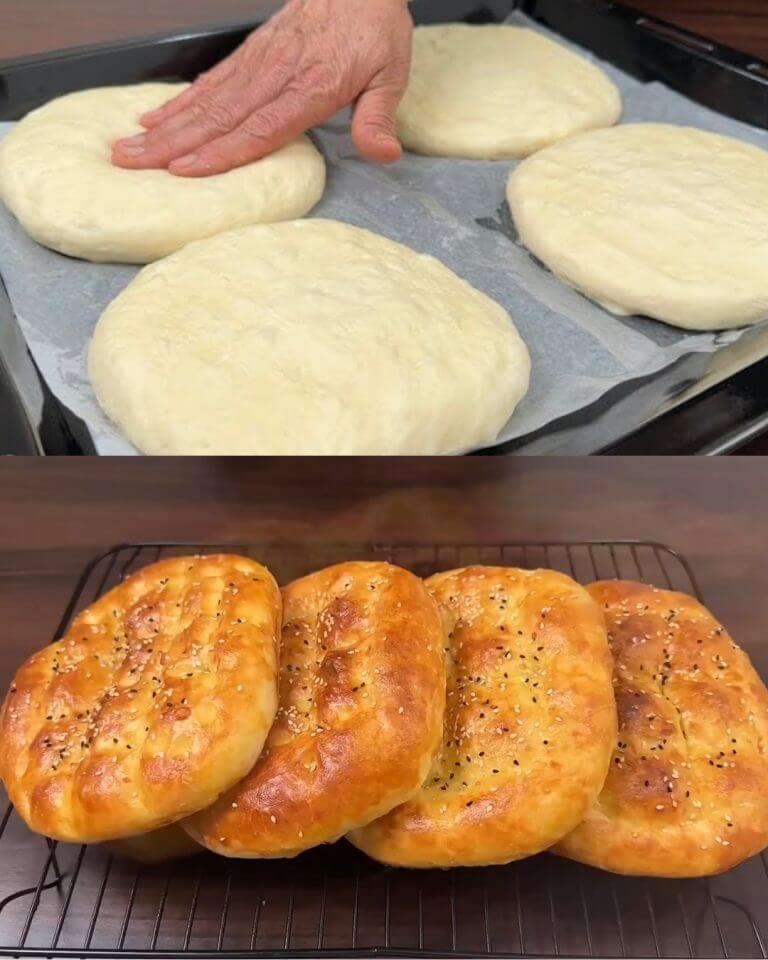
Easy Bread with a Cheesy Twist
Ingredients
For the Yeast Activation:
Warm Milk: 400 ml
Purpose: The warmth of the milk activates the yeast, providing the necessary environment for it to ferment and rise.
Sugar: 15 grams
Purpose: Sugar serves as food for the yeast, helping it to activate quickly and efficiently.
Dry Yeast: 10 grams
Purpose: The key ingredient for leavening, giving the bread its rise and soft texture.
For the Dough:
Wheat Flour: 480 grams
Purpose: The main structure of the bread, providing the gluten network needed for a soft, airy loaf.
Salt: 8 grams
Purpose: Enhances the flavor of the bread and strengthens the gluten structure.
Olive Oil: 20 grams
Purpose: Adds moisture and richness to the dough, resulting in a tender crumb.
Cheese (Mozzarella or Cheddar): 200 grams
Purpose: The star of the recipe, adding a gooey, cheesy center to each piece of bread.
Egg Yolk: 1
Purpose: Provides a rich color and sheen to the finished bread, making it visually appealing.
Vegetable Oil: For greasing
Purpose: Prevents the dough from sticking during the rise and baking process.
Instructions
1. Activate the Yeast:
Warm the Milk: In a small saucepan or microwave-safe bowl, gently warm 400 ml of milk until it reaches a temperature between 37°C to 40°C (98°F to 104°F). The milk should be warm to the touch but not hot, as excessive heat can kill the yeast.
Tip: Use a thermometer for accuracy, or test with your finger—if it feels warm but not uncomfortable, it’s just right.
Combine Ingredients: In a warm, medium-sized bowl, combine the warm milk, 15 grams of sugar, and 10 grams of dry yeast. Stir the mixture gently to dissolve the sugar and yeast completely.
Tip: The sugar helps to “wake up” the yeast, speeding up the activation process.
Let it Sit: Cover the bowl with a clean kitchen towel or plastic wrap and let it sit in a warm place for about 10 minutes. The mixture should become foamy and bubbly, indicating that the yeast is active and ready to use.
Tip: If the mixture does not foam up, the yeast may be expired or the milk too hot or cold—consider starting over to ensure the best results.
2. Prepare the Dough:
Sift the Flour: In a large mixing bowl, sift 480 grams of wheat flour to remove any lumps and ensure a smooth, even texture in the dough.
Tip: Sifting also helps to incorporate air into the flour, which contributes to a lighter bread.
Add Salt: Whisk 8 grams of salt into the sifted flour to distribute it evenly. The salt not only enhances the flavor but also helps to strengthen the gluten network.
Tip: Make sure to mix the salt thoroughly with the flour before adding the yeast mixture, as direct contact with yeast can inhibit its activity.
Combine with Yeast Mixture: Gradually add the activated yeast mixture to the flour mixture, stirring continuously with a wooden spoon or spatula. As you mix, a shaggy dough will start to form.
Tip: Pour the yeast mixture slowly to avoid lumps and ensure an even consistency.
3. Knead the Dough:
Add Olive Oil: Pour 20 grams of olive oil into the dough and begin kneading. Knead the dough for about 3-4 minutes, until it becomes smooth, elastic, and slightly tacky to the touch.
Tip: You can knead the dough by hand on a lightly floured surface or use a stand mixer with a dough hook attachment. If kneading by hand, fold the dough over itself and push it away with the heel of your hand, then rotate and repeat.
Check the Dough: The dough should be smooth, elastic, and just a bit sticky, but not so much that it clings to your fingers. If the dough feels too sticky, add a little more flour, a tablespoon at a time.
4. First Rise:
Grease the Bowl: Lightly grease a large bowl with vegetable oil. Place the dough in the greased bowl, turning it to coat the surface with oil. This prevents the dough from drying out during the rise.
Tip: The oil also helps to create a soft crust on the finished bread.
Cover and Let Rise: Cover the bowl with a clean kitchen towel or plastic wrap and place it in a warm, draft-free spot. Let the dough rise for about 30 minutes, or until it has doubled in size.
Tip: To create a warm environment for rising, you can preheat your oven to the lowest setting for a few minutes, then turn it off and place the dough inside.
5. Shape the Bread:
Punch Down the Dough: After the dough has risen, gently punch it down to release the accumulated air. This helps to create a finer crumb in the finished bread.
Tip: Be gentle when punching down the dough—just a few presses will do.
Divide the Dough: Turn the dough out onto a lightly floured surface. Using a bench scraper or knife, divide the dough into 4 equal parts. Shape each part into a smooth ball by tucking the edges under and rolling it gently between your hands.
Tip: If you prefer smaller rolls, you can divide the dough into more portions—6 to 8 smaller rolls are also a great option.
6. Add the Cheese:
Roll Out the Dough: Take each dough ball and roll it out into a circle or oval shape, about 1/4-inch thick. Ensure that the dough is evenly rolled to avoid thin spots that could tear.
Tip: Dust your rolling pin and surface with a little flour if the dough is sticking.
Place the Cheese: In the center of each rolled-out dough circle, place 50 grams of your chosen cheese—either mozzarella or cheddar. The cheese will melt during baking, creating a deliciously gooey center.
Tip: You can also add a sprinkle of herbs, like oregano or basil, for added flavor.
7. Second Rise:
Shape and Place on Baking Sheet: Fold the dough over the cheese, sealing the edges tightly to prevent any cheese from leaking out during baking. Gently flatten the dough balls slightly and place them on a baking sheet lined with greased baking paper.
Tip: For an extra decorative touch, you can score the tops of the dough balls with a sharp knife in a crisscross pattern.
Cover and Let Rise Again: Cover the prepared dough with a kitchen towel and let it rise for another 20 minutes. This final rise will allow the dough to puff up slightly, resulting in a lighter texture.
Tip: If your kitchen is cold, place the baking sheet near a warm spot, like the back of the stove or in a slightly warmed oven.
8. Egg Wash:
Prepare the Egg Wash: In a small bowl, beat 1 egg yolk with a teaspoon of water until smooth. This egg wash will give the bread a beautiful, shiny finish.
Tip: For a more golden color, add a pinch of sugar to the egg wash.
Brush the Dough: Using a pastry brush, gently brush the tops of the risen dough with the egg wash. Be sure to coat the entire surface for an even color.
Tip: Avoid letting the egg wash drip onto the baking sheet, as it can cause the dough to stick.
9. Bake the Bread:
Preheat the Oven: While the dough is undergoing its second rise, preheat your oven to 200°C (390°F). A hot oven is crucial for achieving a good rise and a nicely browned crust.
Tip: Ensure your oven rack is positioned in the middle of the oven for even baking.
Bake: Place the baking sheet in the preheated oven and bake the bread for 20-25 minutes, or until the tops are golden brown and the bread sounds hollow when tapped on the bottom.
Tip: If you notice the tops browning too quickly, you can tent the bread with aluminum foil to prevent over-browning.
10. Cool and Serve:
Cool on a Rack: Once baked, remove the bread from the oven and transfer it to a wire rack to cool slightly. Allow the bread to cool for at least 10 minutes before slicing, as this helps the cheese set and prevents it from oozing out.
Tip: For extra softness, you can brush the tops of the warm bread with a little melted butter right after

