Homemade Dessert
Homemade Dessert
Ingredients
- Milk: 400 ml (about 1 2/3 cups)
- Purpose: Forms the base of the chocolate mixture, giving it a creamy consistency.
- Milk: 400 ml (about 1 2/3 cups)
- Sugar: 120 grams (about 1/2 cup)
- Purpose: Sweetens the chocolate base, balancing the richness of the cocoa.
- Orange Zest: Zest of 1 orange
- Purpose: Adds a fresh, citrusy aroma and flavor that complements the chocolate.
- Cocoa Powder: 60 grams (about 1/2 cup)
- Purpose: Provides the rich, chocolatey flavor that is the star of the dessert.
- Sugar: 120 grams (about 1/2 cup)
- Butter: 150 grams (about 2/3 cup)
- Purpose: Adds richness and smoothness to the chocolate mixture, making it more indulgent.
- Biscuits: 400 grams (about 14 oz), crushed into small pieces
- Purpose: Forms the crunchy base of the dessert, adding texture and structure.
- Walnuts: 100 grams (about 1 cup), chopped
- Purpose: Adds a nutty flavor and crunch that pairs perfectly with the chocolate.
- Butter: 150 grams (about 2/3 cup)
- Milk Chocolate: 80 grams (about 3 oz)
- Purpose: Used for the middle layer, adding a smooth, sweet chocolate topping.
- Vegetable Oil: 25 ml (about 1.5 tbsp) for the milk chocolate, 10 ml (about 2 tsp) for the white chocolate
- Purpose: Helps the chocolate melt smoothly and creates a glossy finish when set.
- Roasted Peanuts: 60 grams (about 1/2 cup)
- Purpose: Sprinkled over the milk chocolate layer, adding extra crunch and flavor.
- Milk Chocolate: 80 grams (about 3 oz)
- White Chocolate: 50 grams (about 2 oz)
- Purpose: Provides a contrasting sweet, creamy topping that balances the flavors.
Directions
1. Prepare the Base:
- Combine Ingredients: In a medium-sized saucepan, pour in 400 ml of milk and add 120 grams of sugar. Grate the zest of 1 orange directly into the pan, and then add 60 grams of cocoa powder.
- Tip: Use fresh orange zest for the best flavor; it adds a subtle yet delightful citrus note that complements the chocolate beautifully.
- Cook the Mixture: Place the saucepan over medium heat. Stir the mixture continuously until it comes to a boil. This ensures the sugar dissolves completely and the cocoa powder blends smoothly into the milk.
- Tip: Keep an eye on the mixture as it heats to prevent it from scorching or sticking to the bottom of the pan.
- Combine Ingredients: In a medium-sized saucepan, pour in 400 ml of milk and add 120 grams of sugar. Grate the zest of 1 orange directly into the pan, and then add 60 grams of cocoa powder.
2. Add Butter:
- Incorporate the Butter: Once the mixture reaches a boil, remove it from the heat and immediately add 150 grams of butter. Stir until the butter melts completely and is fully incorporated into the chocolate mixture.
- Tip: Let the mixture cool slightly before adding the biscuits and nuts; this will help it thicken slightly and make it easier to mix.
3. Prepare the Biscuit and Nut Mixture:
- Crush the Biscuits: Place 400 grams of biscuits into a large plastic bag or between sheets of parchment paper. Use a rolling pin to crush the biscuits into small, even pieces.
- Tip: You want some texture in the biscuits, so avoid crushing them into a fine powder. Larger pieces will add a satisfying crunch to the dessert.
- Chop the Walnuts: Roughly chop 100 grams of walnuts. The pieces should be small enough to mix well but large enough to add a noticeable crunch.
- Tip: Toast the walnuts beforehand to enhance their flavor and add an extra layer of depth to the dessert.
- Crush the Biscuits: Place 400 grams of biscuits into a large plastic bag or between sheets of parchment paper. Use a rolling pin to crush the biscuits into small, even pieces.
4. Combine and Chill:
- Mix Together: In a large mixing bowl, combine the crushed biscuits and chopped walnuts. Pour the slightly cooled chocolate mixture over the biscuit and nut mixture, stirring until everything is evenly coated.
- Tip: Ensure all the biscuit pieces are well-coated with the chocolate mixture for a consistent flavor in every bite.
- Transfer to Dish: Press the mixture into a dish, spreading it out evenly to create a uniform layer. Refrigerate for 1 hour to allow it to set.
- Tip: Use a spatula or the back of a spoon to press the mixture down firmly, ensuring it holds together well.
5. Prepare the Toppings:
- Melt the Milk Chocolate: In a microwave-safe bowl, combine 80 grams of milk chocolate with 25 ml of vegetable oil. Microwave in 30-second intervals, stirring between each interval, until the chocolate is fully melted and smooth.
- Tip: The vegetable oil helps the chocolate to melt smoothly and gives it a glossy finish once set.
- Melt the Milk Chocolate: In a microwave-safe bowl, combine 80 grams of milk chocolate with 25 ml of vegetable oil. Microwave in 30-second intervals, stirring between each interval, until the chocolate is fully melted and smooth.
- Add Peanuts: Pour the melted milk chocolate over the chilled dessert base. Sprinkle 60 grams of roasted peanuts evenly over the milk chocolate layer.
- Tip: Lightly press the peanuts into the chocolate to help them stick as the chocolate sets.
- Chill Again: Place the dessert back in the refrigerator and chill for 15 minutes to allow the chocolate layer to set.
- Add Peanuts: Pour the melted milk chocolate over the chilled dessert base. Sprinkle 60 grams of roasted peanuts evenly over the milk chocolate layer.
6. Add the Final Layer:
- Melt the White Chocolate: In a separate bowl, melt 50 grams of white chocolate with 10 ml of vegetable oil. Stir until the mixture is smooth and well-combined.
- Tip: White chocolate can burn easily, so melt it in short intervals and stir frequently to avoid overheating.
- Top the Dessert: Pour the melted white chocolate over the dessert, spreading it evenly with a spatula. This final layer adds a sweet, creamy contrast to the rich chocolate and nuts.
- Melt the White Chocolate: In a separate bowl, melt 50 grams of white chocolate with 10 ml of vegetable oil. Stir until the mixture is smooth and well-combined.
- Final Chill: Place the dessert back in the refrigerator for another 15 minutes, allowing the white chocolate layer to fully set.
7. Serve:
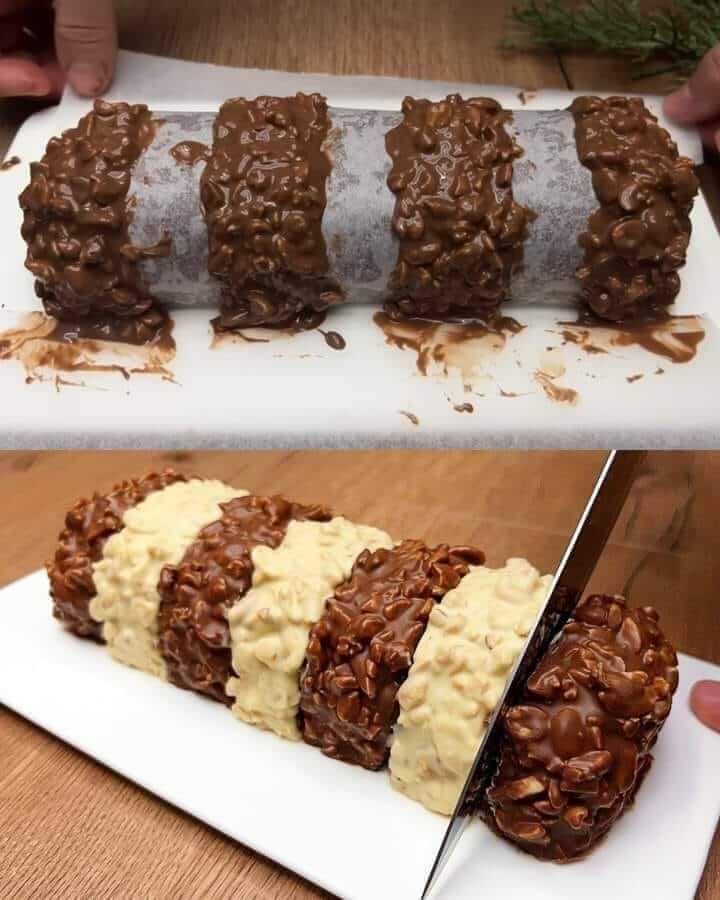
- Slice and Enjoy: Once the dessert is fully chilled and set, it’s ready to serve. Cut it into squares or slices, and enjoy the rich, layered flavors and textures.
- Tip: For clean slices, use a sharp knife warmed under hot water, wiping the blade between each cut.

