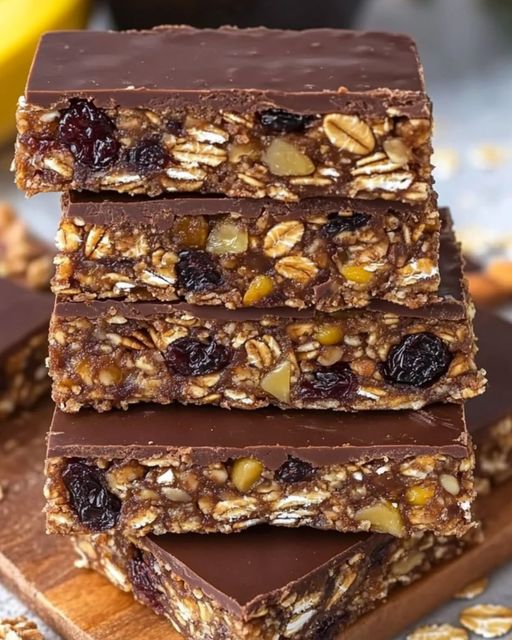
No-Bake Chocolate Nut Energy Bars: A Healthy and Delicious Snack
Ingredients
Here’s what you’ll need to create your own batch of no-bake chocolate nut energy bars:
- Oat Flakes: 80 g (1 cup)
- Raisins: 100 g (3.5 oz)
- Walnuts: 100 g (3.5 oz), chopped
- Prunes: 100 g (3.5 oz), chopped
- Dried Cranberries: 1 tablespoon
- Bananas: 2, ripe
- Dark Chocolate: 40 g (1.4 oz), without sugar
- Coconut Oil: 1 teaspoon (optional, for melting the chocolate)
Step-by-Step Preparation
Step 1: Prep the Oat Flakes
- Combine Oats and Raisins: Start by placing the oat flakes in a large mixing bowl. Add the raisins directly to the oats; no chopping is necessary for the raisins, as they will add a chewy texture and natural sweetness to the bars.
Step 2: Toast the Nuts (Optional)
- Chop the Walnuts: Roughly chop the walnuts on a wooden board. If you prefer a more intense nutty flavor, toast the chopped walnuts briefly in a non-stick pan over medium heat until they are slightly golden and aromatic. This step is optional but enhances the depth of flavor.
Step 3: Chop the Prunes
- Prepare the Prunes and Cranberries: Cut the prunes into smaller pieces and add them to the bowl with the oats and raisins. Toss in the dried cranberries as well. These dried fruits will contribute a rich, sweet flavor and chewy texture to the bars.
Step 4: Blend the Bananas
- Puree the Bananas: Peel the bananas and cut them into smaller chunks. Place them in a blender or use a hand blender to puree the bananas until completely smooth. Ensure that there are no lumps; the banana puree should be silky and mushy, acting as a natural binder for the bars.
Step 5: Combine the Ingredients
- Mix Everything Together: Add the banana puree to the bowl containing the oats, dried fruits, and nuts. Mix everything thoroughly by hand or with a spoon until all ingredients are evenly distributed and the mixture becomes compact and sticky. This ensures that the bars hold together well.
Step 6: Mold the Bars
- Shape the Mixture: Transfer the combined mixture into a smaller square or rectangular mold, spreading it evenly. Press down firmly to ensure the mixture is compact, and smooth the surface with the back of a spoon. Aim for a thickness of about 2 cm (just under 1 inch) to achieve the perfect bar consistency.
Step 7: Bake (Optional)
- Bake for Texture: While these bars can be enjoyed without baking, for a firmer texture, preheat your oven to 180°C (356°F) and bake the mixture for approximately 20 minutes. Baking will help set the bars, making them easier to cut and handle.
Step 8: Chocolate Drizzle
- Melt the Chocolate: While the bars are baking or resting, melt the dark chocolate with a teaspoon of coconut oil over a double boiler or in the microwave in short bursts. Stir until smooth and glossy.
- Drizzle Over Bars: Once the bars are out of the oven and slightly cooled, pour the melted chocolate over the top, spreading it evenly. Place the mold in the refrigerator briefly to allow the chocolate to set.
Step 9: Cut and Enjoy
- Slice into Bars: Once the chocolate has set, remove the mixture from the mold and cut it into bars or cubes of your preferred size. These bars are now ready to be enjoyed as a delicious and nutritious snack!
Serving Suggestions
- On-the-Go Snack: Pack a bar or two in your bag for a quick and energizing snack during the day.
- Pre- or Post-Workout Fuel: Enjoy these bars before or after workouts for a boost of energy and nutrients.
- Healthy Dessert: Serve these bars as a healthy dessert option that satisfies your sweet tooth without the guilt.
Tips and Variations
- Customize Your Mix: Feel free to substitute or add different nuts and dried fruits, such as almonds, pecans, dried apricots, or dates, to suit your taste preferences.
- Add Seeds: Boost the nutritional value by adding chia seeds, flaxseeds, or sunflower seeds to the mixture.
- Spice It Up: Add a pinch of cinnamon or a dash of vanilla extract to the banana puree for extra flavor.
- No-Bake Option: If you prefer a completely no-bake version, skip the oven step and let the mixture set in the fridge for a few hours before cutting into bars.
Nutritional Information
- Serving Size: Makes approximately 12 bars
- Calories: 120 per bar
- Protein: 3 g
- Carbohydrates: 20 g
- Fat: 5 g
- Fiber: 3 g
- Sugars: 10 g (from natural sources)
- Sodium: 5 mg

