No-Bake Cocoa Pancake Cake Recipe
Ingredients
For the Pancake Cocoa Batter:
- 3 large eggs
- A pinch of salt
- 50 g (¼ cup) sugar
- 350 ml (1 ½ cups) milk
- 100 g (¾ cup) flour
- 30 g (¼ cup) cocoa powder
- 2-3 tbsp (30-45 ml) vegetable oil (plus extra for frying)
For the Cream Filling:
- 600 g (2 ½ cups) sour cream
- 80 g (⅓ cup + 1 tbsp) sugar
- 10 g (1 tbsp) vanilla sugar
- 25 g (2 tbsp) gelatin
- 80 ml (⅓ cup) cold water
Step-by-Step Instructions
1. Prepare the Pancake Cocoa Batter
In a large bowl, crack the 3 eggs and add a pinch of salt. Whisk the eggs until lightly beaten. Gradually add 50 g of sugar, whisking continuously to combine.
Slowly pour in the 350 ml of milk in parts, stirring constantly to avoid lumps. Next, sift together the 100 g of flour and 30 g of cocoa powder and gradually add it to the egg mixture. Whisk until the batter is smooth and lump-free. Finally, add 2-3 tablespoons of vegetable oil and mix well.
Cover the bowl with plastic wrap and let the batter rest for 20 minutes. This resting period will allow the flour and cocoa to hydrate, ensuring soft, delicate pancakes.
2. Cook the Pancakes
Once the batter has rested, heat a non-stick pan over medium heat and lightly grease it with a small amount of vegetable oil. Use a ladle to pour a small amount of batter into the pan, swirling it to spread evenly into a thin pancake.
Cook each pancake for 1-2 minutes on each side, or until golden brown and cooked through. Transfer the cooked pancakes to a plate and stack them on top of each other. Let the pancakes cool completely before assembling the cake.
3. Prepare the Cream Filling
In a small bowl, dissolve the 25 g of gelatin in 80 ml of cold water. Let it sit for about 5-10 minutes to bloom. Once bloomed, gently heat the gelatin mixture over low heat or in the microwave until fully dissolved, but avoid boiling it.
In a separate large bowl, combine the 600 g of sour cream, 80 g of sugar, and 10 g of vanilla sugar. Mix until the sugar is fully dissolved and the cream is smooth. Slowly pour the dissolved gelatin mixture into the sour cream, stirring constantly to ensure an even distribution.
4. Assemble the Cake
Prepare a cake hoop (or a springform pan) with a diameter of about 18 cm (7 inches). Line the base of the hoop with foil and wrap the sides with cake foil or parchment paper to make it easier to remove the cake later.
Take the cooled pancakes and roll them up into tight cylinders. Slice each pancake roll into 1.5 cm (½ inch) thick strips. Carefully mix these pancake strips into the prepared cream filling, ensuring they are evenly coated.
Pour the pancake-cream mixture into the prepared cake hoop. Gently shake the pan to help the cream settle and fill any gaps. Cover the cake with plastic wrap and refrigerate for at least 4 hours (or overnight) to allow the gelatin to fully set.
5. Serve
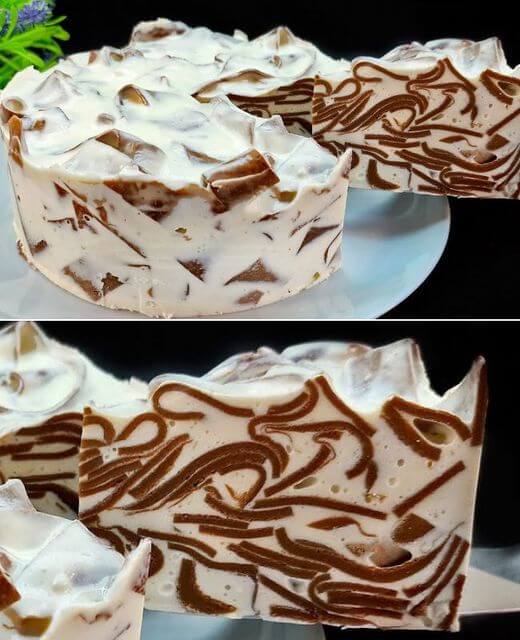
Once set, remove the cake from the refrigerator and carefully take off the hoop and foil. Slice and serve your beautiful no-bake cocoa pancake cake, which features a tiger-like pattern from the rolled pancakes.
Enjoy this elegant and delicious dessert, perfect for any special occasion or as a light, refreshing treat!
Tips for Success:
- Rest the Batter: Allowing the pancake batter to rest is crucial for achieving light and tender pancakes. This step helps hydrate the flour and prevents the pancakes from becoming rubbery.
- Gelatin: Be sure to dissolve the gelatin completely before adding it to the cream to avoid lumps.
- Make Ahead: This cake can be prepared the day before serving, which makes it convenient for entertaining.
Nutritional Information (Per Serving)
This recipe makes approximately 8 servings.
- Calories: 320 kcal
- Protein: 8 g
- Fat: 22 g
- Carbohydrates: 26 g
- Sugar: 15 g
- Fiber: 1 g
- Sodium: 120 mg

