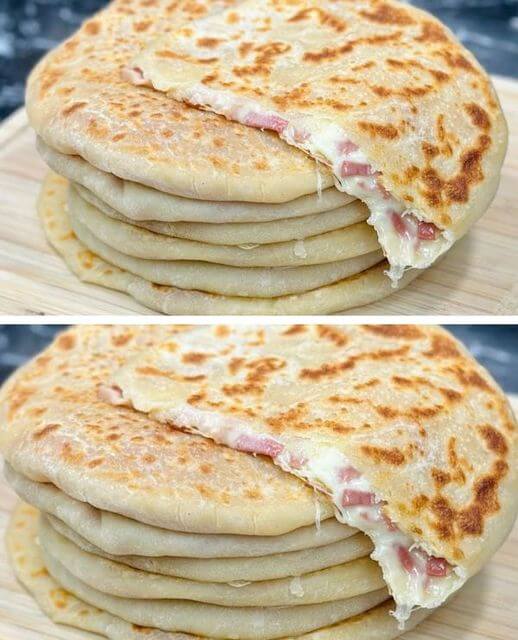
Pan-Stuffed Buns: No Oven Needed and Economical
Ingredients (Makes 8 Large Buns or 4 Small Buns)
For the Dough:
- 3 1/4 cups (400 g) flour
- 1 cup (240 ml) milk, lukewarm
- 2.8 oz (80 g) melted butter
- Salt, to taste
For the Filling:
- 10.6 oz (300 g) grated cheese (e.g., mozzarella, cheddar, or your choice)
- Cold meats of your choice, cut into thin strips (e.g., chicken, ham, salami)
Nutritional Information (Per Large Bun)
- Calories: 280
- Protein: 12 g
- Carbohydrates: 30 g
- Dietary Fiber: 1 g
- Sugars: 2 g
- Fat: 14 g
- Saturated Fat: 8 g
- Cholesterol: 45 mg
- Sodium: 360 mg
Step-by-Step Preparation
Step 1: Prepare the Dough
- In a large mixing bowl, combine 300 g of flour with a pinch of salt. Stir well to evenly distribute the salt throughout the flour. This step ensures that your dough will have a consistent flavor.
- Gradually add 1 cup (240 ml) of lukewarm milk and 40 g of melted butter to the flour mixture. Stir to combine. The milk should be lukewarm (not hot) to help the dough develop a soft, pliable texture.
- Slowly incorporate the remaining 100 g of flour into the mixture, stirring until a dough starts to form.
- Transfer the dough to a floured work surface. Knead the dough for about 5-7 minutes, or until it becomes smooth and homogeneous. This step develops the gluten in the flour, giving the buns a nice structure.
- Shape the dough into a ball, cover it with cling film, and let it rest in the refrigerator for at least 10 minutes. If time allows, let it rest for 30 minutes to 1 hour to make it easier to work with and improve the dough’s elasticity.
Step 2: Prepare the Filling
- While the dough is resting, prepare your fillings. Grate 300 g of your favorite cheese. We recommend mozzarella for its great melting quality, but feel free to use cheddar, gouda, or any other cheese you enjoy.
- Cut your chosen cold meats into thin strips. Options include ham, chicken, salami, or any other cold cut you prefer. You can also add extra fillings like sautéed mushrooms, chopped olives, or herbs for added flavor.
Step 3: Shape the Buns
- Once the dough has rested, divide it into 8 pieces for larger buns or 4 pieces for smaller buns. Use a sharp knife or a dough cutter for clean cuts.
- Flour your work surface to prevent the dough from sticking. Roll out each piece of dough into a flat circle, about 5-6 inches in diameter, using a rolling pin. Add extra flour as needed to keep the dough from sticking to the surface or rolling pin.
- Place a generous handful of grated cheese and some strips of cold meat in the center of each rolled-out dough piece.
- Fold the edges of the dough towards the center, pinching them together to seal the filling inside. If necessary, use the rolling pin to flatten the buns slightly and ensure a good seal. Make sure there are no gaps or the filling might leak during cooking.
Step 4: Cook the Buns
- Heat a non-stick pan over low heat and add a small amount of melted butter. Swirl the pan to coat the bottom evenly.
- Place the buns in the pan, seam side down, and cook for 2 minutes on each side, or until they are golden brown and cooked through. If the buns are browning too quickly, reduce the heat to ensure the insides cook properly without burning the outside.
- Flip the buns and cook for an additional 2 minutes on the other side, adjusting the heat as necessary to achieve an even golden color. You may need to turn the buns a few more times to ensure even cooking.
Step 5: Serve and Enjoy
- Once cooked, remove the buns from the pan and let them cool slightly on a plate. This helps the cheese inside set slightly, making them easier to eat.
- Serve the pan-stuffed buns hot. They are best enjoyed fresh, with the cheese melted and gooey, and the cold meats perfectly warmed through. Serve them as a standalone snack, with a side salad, or alongside your favorite dipping sauces like marinara or garlic butter.
Tips for Perfect Pan-Stuffed Buns
- Experiment with Fillings: Don’t hesitate to get creative with your fillings! Add sautéed vegetables, fresh herbs, or a sprinkle of spices to customize the flavor to your liking.
- Adjust the Size: For a snack-size version, divide the dough into more pieces and make smaller buns. They cook faster and are great for parties or lunchboxes.
- Reheating: To reheat leftover buns, simply warm them in a pan over low heat or in the microwave for a few seconds until heated through. This will restore the cheese’s melty texture.
- Storage: Store any leftover buns in an airtight container in the refrigerator for up to 3 days. Reheat before serving to refresh their texture.

